Last Epoch's current campaign runs through ten chapters. The full route begins on the Old Road, unlocks your mastery after Chapter 2, reaches Majasa in the Chamber of Vessels at the end of Chapter 9, and then continues into the Ancient Era for Chapter 10's pursuit of Apophis. Follow the gold main-quest markers, activate every waypoint you pass, and use the World Map whenever a transition or objective is unclear.
You can enter the Monolith of Fate after Chapter 2, but that is not the same as completing the campaign. A first character benefits from following the story through Chapter 10 because the route opens locations, introduces major systems, provides many opportunities to earn passive points and Idol slots, and includes the Chapter 10 passive-point reward. Dungeon shortcuts and optimized alternate-character routes are outside the scope of this full walkthrough.
Campaign Route at a Glance
| Chapter | Main route | Chapter endpoint |
|---|---|---|
| 1 | Old Road to the Summit | Haruspex Orian |
| 2 | Last Refuge to the Lower District | Husk of Elder Pannion |
| 3 | Cultist Camp to Sanctum Bastille | Emperor's Remains |
| 4 | Outcast Camp to the Imperial Dreadnought | Admiral Harton |
| 5 | Shining Cove to Maj'Elkan Waystation | Spymaster Zerrick |
| 6 | Rust Lands to the Immortal Citadel | Yulia, Harton, and Zerrick |
| 7 | Heoborea to the Tomb of Morditas | Frostroot Warden |
| 8 | Deep Harbor to the Seafloor Colosseum | Lagon |
| 9 | Soreth'Ka to the Chamber of Vessels | Majasa |
| 10 | Ancient Era pursuit through the new campaign zones | Continue the Apophis pursuit and complete Temple of Eterra |
Before You Start the Campaign
Open the World Map with M whenever you lose the route. Its quest log separates gold main quests from silver side quests, selecting a quest moves the map to the correct era, and hovering over a quest icon identifies its area. An unlocked waypoint can be used for immediate travel, so activating waypoints prevents long recovery runs.
The lower-left corner of the World Map tracks the passive-point and Idol-slot rewards you have earned against the character maximum. There are more eligible quests than you need, which means you do not have to complete every side quest. Check these counters periodically and take convenient reward quests until both are full.
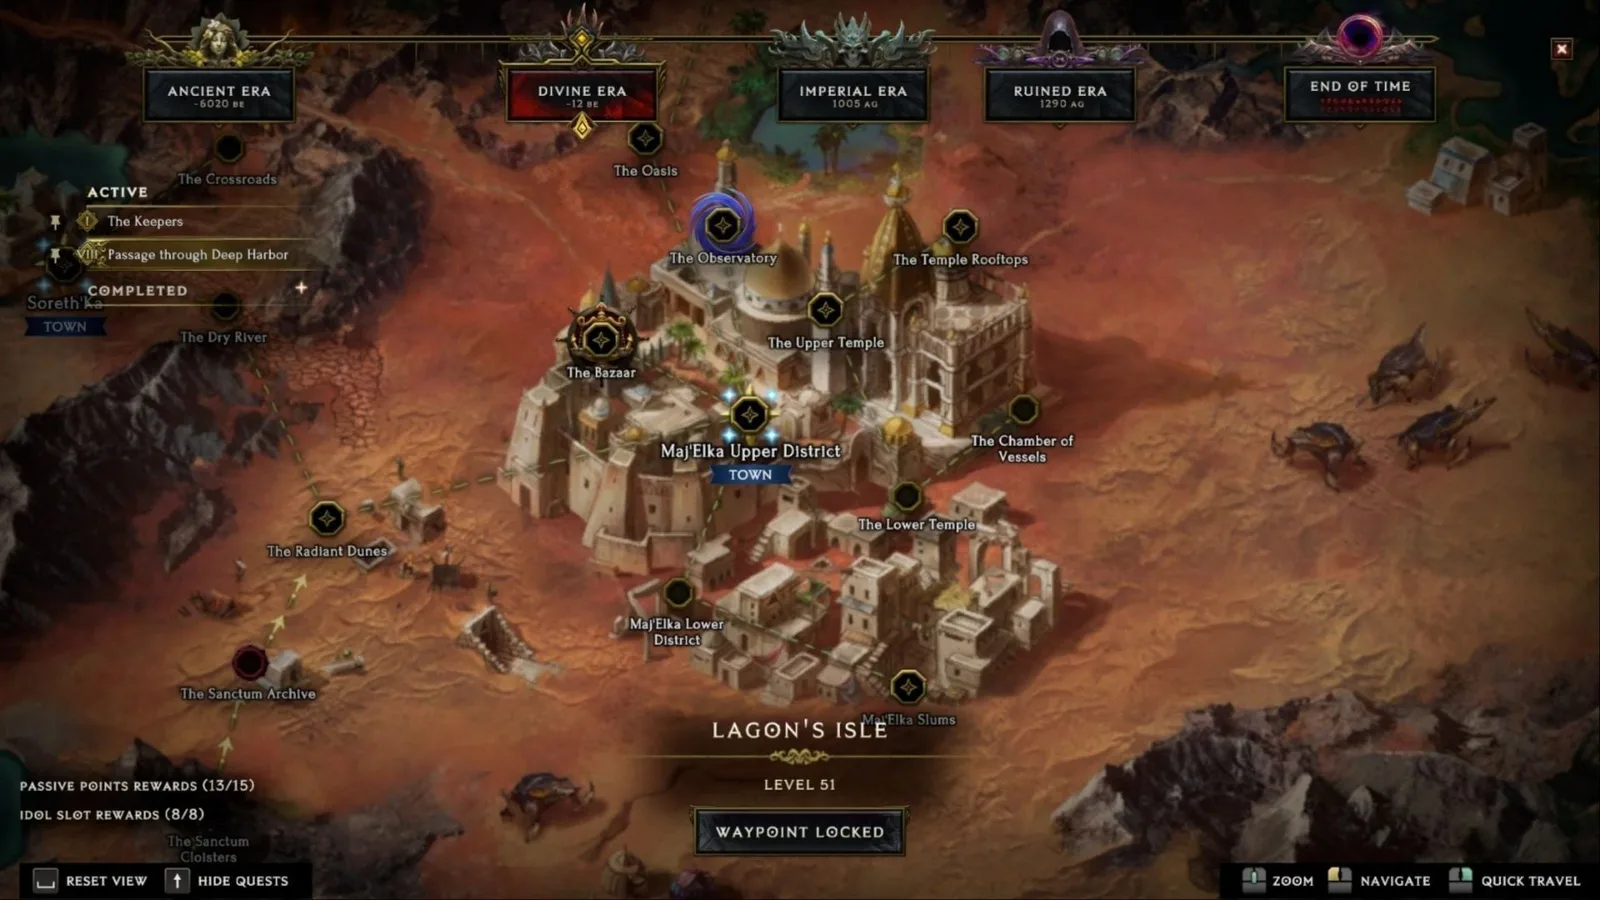
Use the map counters to confirm whether additional reward quests are needed.
Keep a movement skill available, equip useful resistance and health upgrades instead of waiting for perfect items, and use the Forge when a good item needs a crucial resistance or damage affix. If a skill setup stops working, skill points can be reassigned from the Skills window, although points above the minimum skill level must be earned again. Passive points can be changed through Chronomancer Lerinne in towns. She can also change your mastery at the End of Time.
Chapter 1 — The Keepers
Follow the Old Road through the Burning Forest and defeat the Forged Soldier blocking access to the Keepers' Camp. Activate the town waypoint, check the vendor for empty-slot upgrades and movement-speed boots, then continue through the Fortress Gardens to the Fortress Walls.
Take the Storeroom Saboteurs detour when it becomes available. It is short and awards a passive point. After clearing the Storerooms, return to the Fortress Walls and continue into the Keepers' Vault. Defeat the enemies around Keeper Balthas, survive the following waves, and leave through the Northern Road.
When Balthas is taken, return to the Keepers' Camp, speak with the Keepers, and travel through the Ulatri Highlands and Osprix Warcamp to the Summit. Haruspex Orian's dangerous attacks are clearly telegraphed: move away when he rises for the large fireball and leave the narrow flame-breath cone. Free Balthas after the fight, then return to camp to finish The Shard and enter Chapter 2.
Chapter 2 — The Ruined Future
Move from the Ulatri Cliffs into Last Refuge Outskirts. Speak to the guards along the route, take Evacuation from Guardsman Dolus, and rescue the marked civilians before entering the Council Chambers. This compact side quest awards a passive point.
In the Council Chambers, advance the main quest with Elder Gaspar and collect Erza's Ledger. The ledger can be returned to either Elder Erza for Avarice or Artem for Gambler's Fallacy. This is an exclusive reward choice, so choose the item that suits the character rather than expecting to receive both.
Travel through the Last Archive to Pannion's Study, defeat Pannion's corrupted students, and return to Gaspar. The next route crosses the Precipice through time rifts. Take the Upper District branch if you want its passive-point quest, then enter the Armoury, clear the waves, defeat the Voidfused Forge, and continue into the Lower District.
The Husk of Elder Pannion rotates its fire beam clockwise, so move around the boss in the same direction instead of crossing the beam repeatedly. Leave the lightning field and any large marked impact zones. After the fight, take the Epoch shard to the End of Time, speak with Elder Gaspar, select your mastery, and return to the Council Chambers to begin The Ruined World.
Chapter 3 — Seeking the Last Shard
Leave the Council Chambers through the Sheltered Wood and Surface, then continue to the Cultist Camp. Speak with Maceth and Leyda before visiting the Welryn Docks for the Symbol of Hope and the Welryn Undercity for the Last Imperial's objectives. Return to camp and enter the Ritual Site, where destroying the Void Amalgamation opens the way forward.
At the Shattered Valley, the most useful campaign detours are The Lesser Refuge and An Ancient Hunt. The Lesser Refuge ends in the Lost Refuge and awards two passive points. An Ancient Hunt uses the time rift to the Ancient Forest and advances your Idol-slot rewards after the Primeval Dragon is defeated and the quest is returned.
Continue east through the Courtyard and Temple of Eterra. In the Lotus Halls, recover the bridge mechanism objective through a time rift, use a town portal when the route requires it, and return to the central bridge. Cross into Sanctum Bastille and fight Emperor's Remains. Move out of its ground effects and destroy the summoned eyes firing persistent Void beams so the arena remains safe.
Chapter 4 — The Outcasts and the Empire
At the End of Time, speak with Elder Gaspar and take the rift to the Outcast Camp. Advance The Immortal Empire with the Outcast Queen, then travel west through Welryn Outskirts, Imperial Welryn, and Soul Wardens' Road. Clear the undead ambush at the closed gate to reach the Risen Lake.
Use the nearby time rift to visit the Corrupted Lake. Defeating the Prophet of Ruin and Idol of Ruin completes a quest that contributes both a passive point and Idol-slot progress. Return to the Risen Lake, continue through the Fallen Tower, and enter Imperial Thetima.
From Thetima, cross the Darkling Pier and board the Imperial Dreadnought. Push east through the ship until you reach the Dreadnought's Deck. Admiral Harton is easier to control at close range because creating too much distance prompts repeated lightning attacks. Move out of stationary effects, defeat him, release Alric, and jump from the ship to reach the Shining Cove.
Chapter 5 — Aid from an Oracle
Speak with Alric at the Shining Cove and cross the Majasan Desert and Wraith Dunes to Maj'Elka. Take The Hidden Gems from Rouj Zabat before leaving the desert. Inside Maj'Elka, follow Alric between the marked encounters, defeat the Imperial forces, and collect the objectives that open the route through the Sapphire Quarter to the Oracle's Abode.
Speak with the Shrine Maiden before the Oracle so The Sapphire Tablet is active. After receiving The Desert Waystation, return to the Shining Cove, take the newly accessible time rift, defeat Ortra'ek the Survivor, and collect the tablet. Activate the Temporal Sanctum waypoint, return to the Oracle's Abode, and turn in the tablet for a passive point and Idol-slot progress.
Proceed through the Maj'Elkan Catacombs and Titan's Canyon. Spymaster Zerrick can prevent hit damage while hidden, so remain close enough to draw out his vulnerable form without standing in the poison pools. After defeating him, enter the Maj'Elkan Waystation, speak with Alric, and use the device that carries the story into Chapter 6.
Chapter 6 — Infiltrating the Immortal Citadel
Speak with Yulia, cross the Rust Lands, and continue through the Lower Sewers, Barren Aqueduct, and Necropolis of the Deep. Yulia's Haven is the chapter hub. Speak with Yulia there to complete Journey to the Necropolis and begin The Immortal Citadel. Alric's Revenge is an optional nearby passive-point quest if your World Map counter is still incomplete.
Travel through the Upper Necropolis into the Citadel Sewers. The Imperial Watchers patrol around the area; moving clockwise helps you meet their counter-clockwise route instead of chasing them. Defeat all marked Watchers to remove the seal, then continue through the Immortal Summit and operate the bridge lever.
The Immortal Citadel encounter places Pontifex Yulia, Admiral Harton, and Spymaster Zerrick in the same arena. Focus Yulia first because she supports the other bosses. Eliminate Harton next, then handle Zerrick while keeping clear of his poison zones. The usable arena becomes smaller as bosses fall, so save a movement skill for repositioning.
Chapter 7 — The Might of Gods
Leave the Gates of Solarum through the Burning Forest and Scorched Grove, watch the confrontation involving Heorot, and continue to Heoborea. Take A Heoborean Cure from the Medicine Man before leaving town because its ingredients lie close to the main route.
Travel through the Heoborean Forest and Nomad Camp to the Wengari Fortress. Accept Liberating the Nomads, defeat the Wengari Beastmaster, free the captives, and eliminate the Wengari Patriarch and Matriarch. Focus the staff-wielding Patriarch first to reduce the overlapping cold spells. Turning in this quest advances your Idol-slot rewards.
Return to the Heoborean Forest, cross the Ice Caverns, defeat the marked creatures needed for the cure, and use the Blessed Horn in the Tundra to open the ice bridge. Defeat Spreading Frost in the Temple of Heorot, then follow the Farwood and Frozen Roots to the Tomb of Morditas. Move away when the Frostroot Warden raises its front roots for the large frontal attack. Recover the Lance of Heorot, return to Heoborea, turn in the cure, and follow Heorot's Last Blessing toward the Northern Stream.
Chapter 8 — Lagon's Blessing
Follow the Northern Stream to Deep Harbor. Speak with Yulia, enter the Burning Pier, and defeat the two marked Osprix commanders. Return to the harbor and use the ferryman to reach Lake Liath. Continue through Liath's Road to Thetima, speaking with Architect Liath when the blocked path opens.
In Thetima, speak with Yulia and Captain Harton, then travel to Lagon's Isle and the Moonlit Shrine. Collect one Moon Fragment from the Strand of Storms and the other from the Coral Pools. Place both fragments at the shrine to open the Temple of Lagon.
The temple and its depths contain several dead ends, so follow the objective marker and the enemy-filled route toward the northeast exit. Defeat Architect Liath in the Sanctum of the Architect, prioritizing her summons when they restrict the arena, then enter the Seafloor Colosseum.
Damage Lagon through his tentacles. Move away from large circular effects, watch his head and eye for the direction of the incoming beam or sweep, and use decisive movement rather than trying to absorb the hit. During the lower-arena phase, kill tentacles while avoiding the waves crossing the floor. The final phase repeats the opening mechanics. Speak with Lagon after the fight and take his portal back to Thetima.
Chapter 9 — The Sands of Majasa
Take the ship to Soreth'Ka, speak with Yulia and Saazhar, and move north into the Crossroads. After repelling the Osprix, return through the portal, speak with Yulia again, and travel east through the Dry River and Radiant Dunes. Defeat the Scalebane Swarmkeeper, free Zerrick, and continue to Maj'Elka Upper District.
Speak with the Nagasa Guard, Yulia, and Zerrick, then enter the Lower District. At the Scalebane Bodyguard, fighting avoids surrendering the requested gold. Continue into the Maj'Elka Slums and enter the easternmost hideout to defeat the Scalebane Guild Leader. Return to Zerrick, then travel through the Oasis and Crystal Mines to the Osprix Warcamp.
Defeat the Siege Golem, board the giant eagle, survive the attack during the flight, and cross the Temple Rooftops. The Upper Temple waypoint is your final convenient preparation stop, so repair weak resistances, refill potions, and organize Idols before entering the Lower Temple. Defeat Apophis's waves and proceed to the Chamber of Vessels.
Majasa's first phase combines elemental attacks with crystal intermissions. Leave Stone Gaze's cone before its slowing stacks immobilize you, keep moving through Poison Rain and targeted impacts, and destroy the summoned crystals instead of allowing their projectiles to accumulate.
During the second phase, Majasa becomes a close-range physical threat. Create distance when repeated hits begin reducing your armor, move out of the large blood pulse, and continue attacking when she retreats to a sarcophagus to heal. The healing sequence cannot be interrupted, but damage dealt during it still reduces the amount you must fight through afterward. Defeat her to complete Chapter 9. Majasa is no longer the end of the current campaign. The Season 5 rules also removed her former +1 to all Attributes reward. The main story continues directly into Chapter 10.
Chapter 10 — The Observer
Chapter 10 continues after Majasa and takes the pursuit of Apophis into the Ancient Era. It added 17 campaign zones in Season 3; the current reward rules changed again in Season 5. Complete the main quest chain rather than stopping at the Chamber of Vessels.
| Main quest | Route and objective |
|---|---|
| Finding Apophis | Speak with the Forgotten Knight to continue the pursuit in the Ancient Era |
| Chasing Apophis | Follow the Ancient Oasis trail; use the Fungal Tunnels after the Crystal Cave exit is destroyed, reach the Mountain Ascent, meet the mysterious figure and fight Apophis |
| Escape the Draal | Defeat the Draal Queen, leave the hive, speak with the Observer at the Silent Coast, then use the Farsight Turtle to reach the Garden and speak with Ophid |
| Ancient Power | Go through the Untamed Forest to the Dragon Grotto, clear the eggs blocking the chain and activate its mechanism; return to the Garden elevator, climb the Sky Chains and defeat the Twin Dragons |
| Temple of Eterra | Defeat the Temple Guardians in the Temple in the Sky, inspect the Divine Effigies in Eterra's Arboretum, then progress through the Halls of Preservation to the Observer's Prison and speak with Eterra after the encounter |
Keep the active main quest selected on the World Map so that its highlighted location and Era match your objective. Activate waypoints as you progress and reselect the quest after a major transition. Glittering Ambrosia and Dragon Hunt are side quests; they are not additional gates in this main-story sequence.
Temple of Eterra gives a passive point under the current rules. Neither defeating Majasa nor completing the Observer encounter now grants the old +1 to all Attributes reward. The +2 to all Attributes reward belongs to gathering five Knowledge of Orobyss in the endgame quest instead.
That Knowledge quest continues through Monolith Timeline completion and a return to Elder Gaspar. It is separate from finishing Chapter 10. If you are checking whether your character received the attribute reward, inspect the Knowledge quest objective and completion state; do not repeat Majasa expecting the removed bonus.
After finishing the current main story, use the World Map reward counter to identify any remaining passive-point or Idol-slot rewards. Main-story completion, those reward counters and Knowledge of Orobyss progression measure different tasks. A character can finish one while still having work left in another.
Essential Campaign Reward Check
Before leaving the campaign behind, open the World Map and inspect the passive-point and Idol-slot counters. If either counter is incomplete, choose nearby eligible quests rather than clearing every side quest indiscriminately.
Useful passive-point stops include Storeroom Saboteurs in Chapter 1; Evacuation and The Upper District in Chapter 2; The Lesser Refuge in Chapter 3; The Corrupted Lake in Chapter 4; Hidden Gems and The Sapphire Tablet in Chapter 5; Alric's Revenge in Chapter 6; Liath's Tower in Chapter 8; and Desert Treasure or Oasis Hunt in Chapter 9. Main quests also supply several passive points naturally.
Useful Idol-slot stops include An Ancient Hunt, The Corrupted Lake, The Sapphire Tablet, Liberating the Nomads, A Heoborean Cure, Liath's Tower, Harton's Idol, Arjani the Ruby Commander, Desert Treasure, and Too Greedily, Too Deep. Stop taking detours once the World Map confirms that the relevant reward category is full.
Common Progression Problems
- The next objective appears to be in another era: Select the quest in the World Map. The map changes to the correct era and highlights the relevant location.
- A route ends at a broken bridge or sealed path: Look for a nearby time rift, marked enemy group, lever, altar, or quest interaction. Chapters 2, 3, and 5 frequently use era changes to bypass blocked terrain.
- A boss takes no hit damage: Spymaster Zerrick must be drawn into his exposed state. Lagon must be attacked through his tentacles.
- The objective marker disappeared after a side trip: Re-pin the quest from the map's quest log and travel to its most recent unlocked waypoint.
- A boss repeatedly kills the character: Replace empty or obsolete gear, add health and the damage-type resistance used in that chapter, then return. Most campaign bosses reward avoiding telegraphed zones more than standing still for maximum damage.
- Passive or Idol rewards seem to be missing: Trust the World Map counters rather than an old fixed route. Multiple quests can contribute to the same capped reward totals.
After the Campaign
After completing Chapter 10, begin the Monolith of Fate progression from the End of Time. Normal timelines become the next structured path for experience, blessings, and equipment. Any unfinished passive-point or Idol-slot rewards can still be collected later; campaign completion does not erase those quests or force you to solve every detour before entering the endgame.