
The most useful Last Epoch guides solve the problem stopping your character now. If the campaign feels difficult, check the main skill, weapon and defenses. If Monoliths feel slow, identify whether the constraint is damage, recovery, mana, missing rewards or unclear farming targets. Make one change that addresses that constraint, then reassess before moving to harder content.
For Season 5, also check whether an older guide assumes a system that has changed. Circle of Fortune uses Prophecy charges and lenses, Merchant's Guild no longer ties equipment purchase access to faction rank, and current legendary crafting includes a chosen-affix option at Temporal Sanctum tier two and above. A familiar guide title does not guarantee that every step still matches the character you are playing.
Identify the blocker in one sentence
Describe the failure before choosing a solution. “I die during the boss's beam” is different from “my health never recovers after a hit.” “I run out of mana after casting support skills” is different from “my damage skill has no useful weapon scaling.” A precise description prevents an expensive change aimed at the wrong problem.
| What happens | First area to inspect | Useful next action |
|---|---|---|
| Ordinary enemies take too long | Main skill and weapon | Check relevant damage affixes and the item's base |
| Mana repeatedly reaches zero | Costs, triggers and recovery | Separate main attacks from the support sequence |
| One large attack kills the character | Defensive gaps and positioning | Review the attack type and available mitigation |
| Health stays low after combat | Recovery | Identify a reliable heal, leech or regeneration source |
| Good items seem absent | Filter and farming target | Inspect rule behavior and the activity's reward purpose |
| A copied build does not function | Required interactions | Check the unique, conversion and trigger prerequisites |
Pick the line that best describes the repeated problem. Several issues can coexist, but solving the most immediate one often reveals the next priority. A character that survives only briefly cannot provide a useful comparison of long boss rotations.
Use a manageable activity for the first check. If the character fails in normal packs, testing at a much higher Corruption adds danger without clarifying the basic interaction. Keep the environment simple enough that you can observe the skill, resource bar and recovery.
Verify the damage skill before replacing the build
Read the main skill's scaling tags and specialization choices. Confirm whether the damage is a hit, an ailment, a minion effect or another triggered skill. Then check that the gear bonuses apply to that damage. A generic percentage with the wrong condition can occupy an equipment slot without supporting the engine you intended.
Inspect conversions carefully. If a node changes the damage type or turns a skill into a different role, the item plan should follow the actual result. Do not copy the weapon from one configuration and the specialization from another simply because they use the same base skill.
Build-defining uniques deserve an explicit check. If the guide's engine depends on an item, having ordinary gear with similar general stats may not reproduce the effect. Keep a working starter setup until the required item is obtained rather than expecting the missing interaction to emerge through more character levels.
Also check the weapon base. During the campaign, a suitable replacement can be a substantial improvement even without perfect affixes. Evaluate it within the current damage plan and avoid assuming that a higher rarity always means the correct upgrade.
After a recent respec, confirm that the essential nodes are actually allocated. The correct skill on the action bar is only part of the configuration. Missing conversion, trigger or cost-reduction nodes can change both damage and the way the rotation functions.
Separate resource spending from recovery
Watch the mana bar through the actual rotation. Cast the main attack first, then add the supporting skills individually. If the bar only collapses after a particular support sequence, solve that sequence rather than replacing every offensive item.
Automatic triggers can still carry costs. Read the node or item that triggers the skill and check whether the generated casts spend mana. A skill being cast indirectly does not establish that its resource burden disappeared.
Next inspect recovery. A larger mana pool gives more room to spend, while mana regeneration or a specific recovery interaction changes how quickly you can resume. Some builds deliberately use low or missing mana; others depend on keeping enough available for movement and defense. Follow the engine you chose instead of combining conflicting resource plans.
For health, identify the source that restores it after damage. Leech depends on dealing the matching damage, regeneration continues on its own, and active healing or potions require available effects and timing. A high maximum health total does not ensure recovery between repeated attacks.
Consider what happens while moving away from a boss. Attack-triggered recovery may be absent, while ongoing damage can remain dangerous. Plan that window rather than judging the character only while attacking an easy pack. Recovery uptime is part of the build, just as damage uptime is.
Diagnose deaths by the damage pattern
Start with health and resistance coverage, then inspect the defensive layers your class and chosen skills can support. Do not assume that one large number protects against every kind of incoming damage. Armor, dodge and block primarily address hits, while damage-over-time effects require attention to the relevant defenses and positioning.
Endurance protects health below its threshold and does not directly protect ward. A ward-focused character needs reliable generation and enough protection during low-ward windows. A hybrid character should also consider what happens once the ward is gone and damage reaches health.
Critical strike avoidance and reduced bonus damage taken from critical strikes are different routes to addressing critical hits. Inspect the current setup for a coherent solution instead of adding a little of everything without understanding the remaining gap. The exact gear choice should serve the character's available affixes and passives.
Use defensive skills before the dangerous attack when their effects require timing. A Flame Ward charge spent on an ordinary pack may be unavailable for the boss window that actually threatens you. Likewise, movement used purely for travel can leave no escape when the next rare appears.
If deaths are repeated in the same mechanic, improve the response to that mechanic as well as the gear. Observe the telegraph, leave the dangerous area and resume damage when it is safe. An older showcase of another character absorbing an attack is not a guarantee that your current setup can do the same.
Check campaign rewards before permanent Monolith progression
The campaign provides up to fifteen bonus passive points and eight idol slots. Verify the actual reward totals on the current character before treating its leveling setup as complete. Reaching a named chapter is not a substitute for checking the rewards you earned, particularly after Season 5 quest changes.
More than one campaign route can lead toward the cap, so focus on the missing reward rather than blindly repeating every side quest. If you skipped an area, inspect whether its quest offers a reward you still need. A character with missing points can look weaker than the copied planner even when the gear is reasonable.
Use the available idol space to solve practical gaps. An early resistance idol can be valuable while the later damage idol layout is unavailable. Do not leave space empty simply because you lack the exact aspirational combination shown in a finished build.
When entering normal Monoliths, bring a working main attack, movement option, resource loop and recovery plan. The activity gives another equipment progression route, but it does not automatically correct a broken build interaction. Check ordinary encounters and a manageable boss before increasing difficulty.
If the campaign boss is the blocker, identify whether the issue is its mechanic or the character's setup. Long fights can expose a recovery problem, while a repeated telegraphed death may require different positioning. The useful guide is the one that addresses that specific condition, not necessarily another complete leveling route.
Give the farming session a concrete target
Choose an equipment or system outcome before starting another long session. A required unique, a better weapon base, an eligible legendary donor or a useful Blessing are clearer goals than “farm until stronger.” Each can be matched to an activity and a reason for keeping the drops.
For a Blessing, target the timeline's own reward pool and check the effect you need. For a crafting donor, inspect the item type and relevant affixes. For a required unique, distinguish its enabling interaction from the optional improvements provided by Legendary Potential.
Corruption increases Monolith difficulty, but more difficulty is not automatically the best answer to every farming problem. If the character clears slowly or dies often, a manageable setting can provide more consistent progress. Decide whether the next increase serves a specific goal your build can support.
Seasonal rituals add another reward decision. Before modifying the reward setup further, understand the cost in reward space and whether the current items already serve the goal. A promising future outcome should not cause you to discard a useful present reward without a reason.
If you use Circle of Fortune, align the Prophecy reward and activity conditions with the farm. If you use Merchant's Guild, use the current equipment purchase access and item eligibility rather than an obsolete rank requirement. The faction changes the acquisition route, but the target should still be a named improvement to the character.
Check filtering before concluding that loot is missing
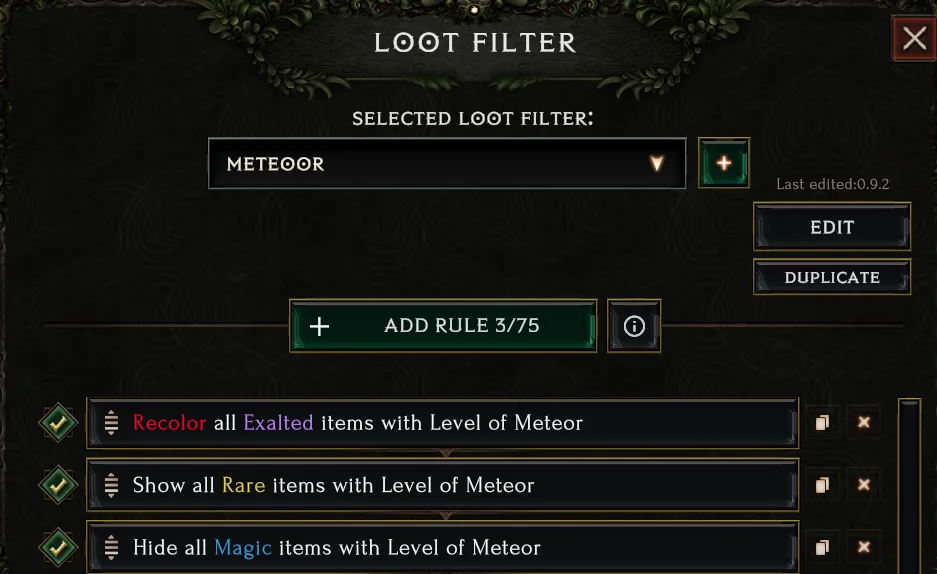
A loot filter changes item-label visibility, not the underlying quality of drops. If valuable bases seem absent, inspect whether the active rules hide them. A stricter endgame filter can be unsuitable for a leveling character that still needs ordinary upgrades and shard materials.
Open the filter manager with Shift F and review the relevant conditions and rule order. Higher rules take precedence, so a broad hide rule can conflict with a later show rule if arranged incorrectly. Use the hidden-item display to inspect a known example and identify the rule affecting it.
Keep items that serve the current build or a defined crafting project visible. A filter can highlight suitable bases, useful class affixes and relevant idols without requiring a large number of rules. Make it stricter as the equipment improves, rather than hiding most ordinary loot before the character's gaps are filled.
If a displayed item is still not an upgrade, that does not mean the rule is broken. The filter highlights candidates; you evaluate the complete affix combination, implicit and remaining crafting capacity. Avoid expecting it to make every keep-or-discard decision automatically.
After a build transition, review the filter again. The damage type, weapon category or required class affix may have changed. A filter tailored to the previous engine can quietly remove the items needed by the replacement.
Use the next guide for one defined outcome
Once the blocker is identified, choose the smallest useful next task. Repair a weapon or defense gap, establish a missing skill interaction, earn the remaining campaign reward, acquire a named item or prepare one legendary craft. Each produces an outcome you can inspect.
Keep your current equipment and planner available while trying the change. Altering one meaningful component makes it easier to assess whether the problem improved. If the character still fails in the same way, revisit the diagnosis before adding another expensive item.
For a major build transition, confirm the enabling items, unlocked skills, resource support and defenses together. A character level or an aspirational screenshot does not establish that those conditions are met. Continue using the working configuration until the replacement has a complete loop.
For an apparent game fault, check the current behavior and recent fixes before inventing a gear explanation. Patch 1.5.2 changes several skill and interface behaviors, including Lightning Blast target priority and misleading tooltip borders. A display correction should not be turned into a claim that the character gained damage or a new item property.
The next useful guide should leave you with a concrete action and a condition for success. When the skill works, the resource bar stays manageable or the missing defense is restored, return to progression and identify the next constraint from the character's actual behavior.